
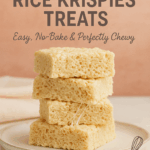
The Best Gooey Rice Krispies Treats

Some desserts instantly transport you back to childhood—and Rice Krispies Treats are one of them. I can still remember standing on a stepstool in my grandma’s kitchen, holding the wooden spoon with all my strength as she poured in the crispy cereal. The butter and marshmallows had already melted into the most irresistible, sticky cloud of sweetness, and the whole room smelled like magic. The best part? Sneaking a taste before the treats were even pressed into the pan.
Rice Krispies Treats are more than just a quick no-bake recipe—they’re a tradition. They’ve been packed in lunchboxes, served at bake sales, and made for countless family gatherings. They’re the kind of treat that feels fancy enough for a party but simple enough for a Tuesday night snack.
Over the years, I’ve tested plenty of variations—extra marshmallows, less butter, more butter (the clear winner!), and even mix-ins like chocolate or candy. But this version? It’s my go-to recipe because it hits that perfect balance: thick and soft, with just the right amount of chew, and a rich buttery flavor that keeps you reaching for “just one more.”
If you’ve ever had Rice Krispies Treats turn out too hard or too sticky, don’t worry—I’ve got all the tips and tricks to make sure yours are perfect every single time.
Ingredients
- 6 Tbsp salted butter (unsalted works too—just add a pinch of salt)
- 16 oz mini marshmallows (reserve 1 cup to fold in at the end)
- 1 tsp pure vanilla extract
- 6 cups Rice Krispies cereal (or any crispy rice cereal brand—fresh is key)
Step-by-Step Instructions
- Prep your pan. Line a 9-inch square baking dish with parchment paper or lightly grease it.
- Melt the butter. In a large pot, melt butter over medium heat.
- Add marshmallows. Stir in all but 1 cup of the marshmallows. Reduce the heat to low and stir constantly until smooth and melted.
- Stir in vanilla. Remove from heat and quickly mix in the vanilla extract.
- Add the cereal. Gently fold in the Rice Krispies cereal and reserved marshmallows until evenly coated.
- Press lightly into pan. Use a spatula or your fingertips (greased or dipped in water) to press the mixture into the pan. Don’t pack it down tightly—just enough to even it out.
- Let them set. Allow the treats to cool for about 1 hour before slicing into squares.
Tips for Success
- Use fresh ingredients. Stale marshmallows or cereal will make tough bars.
- Don’t over-pack. Gently press the mixture into the pan for soft, chewy treats.
- Try browned butter. Cook the butter until golden for a nutty, caramel flavor twist.
- Storage. Keep in an airtight container at room temperature for up to 2 days, or freeze individually wrapped bars.
Fun Variations
- Chocolate Lovers: Stir in 1 cup of mini chocolate chips (let the mixture cool a few minutes first so they don’t all melt).
- Peanut Butter Swirl: Mix ¼ cup creamy peanut butter with the melted marshmallows for a nutty flavor.
- Holiday Treats: Add sprinkles, M&Ms, or crushed candy canes to make them festive.
The Best Gooey Rice Krispies Treats
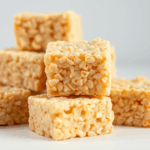
Thick, buttery, and gooey Rice Krispies Treats with just the right amount of chew. A no-bake classic that never goes out of style!
- Prep Time: 10 minutes
- Cook Time: 5 minutes
- Total Time: 15 minutes
- Yield: 16 bars
- Category: Dessert
- Method: No Bake
- Cuisine: American
- Diet: Vegetarian
Ingredients
- 6 Tbsp salted butter
- 16 oz mini marshmallows (reserve 1 cup)
- 1 tsp pure vanilla extract
- 6 cups Rice Krispies cereal
Instructions
- Line a 9-inch square baking dish with parchment paper or lightly grease it.
- Melt butter in a large pot over medium heat.
- Add all but 1 cup of the marshmallows. Reduce the heat to low and stir until the mixture is completely melted.
- Remove from heat and stir in vanilla extract.
- Fold in the cereal and reserved marshmallows until evenly coated.
- Press mixture lightly into prepared pan using greased fingertips or a spatula.
- Let it sit for 1 hour before cutting into squares.
Notes
Use fresh cereal and marshmallows for the best results. Do not press the mixture too firmly into the pan—this helps keep the treats soft and chewy.
Leave a Reply